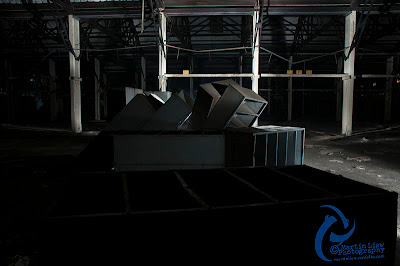
Stack of Zeros
Today I want to present the making of one of my nocturne images which is shown here, titled Stack of Zeros. In this picture, there are parallel and perpendicular lines, symmetrically speaking with the metallic shelves topples over the other like Dominoes.
So make a jump over the deck and I'll show you how I made this picture, step by step explanation with images.
OK let's begin with the original image I took with my cell phone camera during my location recce one week prior to the actual night outing. Here's how it looks like in broad day light. These metallic shelves are found inside a huge abandoned building.
See how the light falls on the metallic shelves in contrast with the vast symmetrical background of pillars. The light came through a large tumbled roof top on the camera left, about 20 meters away. I adapted the same lighting direction during the night long exposure which you will see later on.
This is huge building, a decommissioned army base known as Ordnance Supply Base, OSB in short or aka Woodlands Camp I. It was established in September 1970 as a storage center for weapons, ammunition and spare parts of military vehicles, but was decommissioned in 1981. It was also the previous location of Singapore Technologies (ST) Logistic before it was shifted to Clementi.
A brief history of OSB. Back in the 1930s, it was a British military camp known as Kranji Army Barracks. During the Japanese Occupation (1942 – 1945), the Japanese military took over the barracks and set up a prison-of-war camp here. Fast forward to present day, OSB is listed as one of the visiting points for Kranji Heritage Trail, launched in November 2011.
Coming back to Stack of Zeros. On the actual night outing which was a full moon night, I took up position and composed the image. The method I used here is to make a few long exposure images and then stack them together in different layers in Photoshop using Masking technique. Well it's similar to HDR stacking process or concept but hand-crafted (light-painting) in execution and for post-processing part, the main reason is to get varied balanced lightings of different areas in the scene.
First off, here's the "base" exposure I made with colored gel light-paintings; yellow on the foreground shelves and neutral LED lights on the rest. LED light creates a neutral blue color cast and depends on the distance between the flashlight and subject, the color tone varies. So in this case, you can see the blue color cast on the foreground is different from the turquoise color on the stacked shelves.
It took me three tries to get this right. Based on this exposure you can see the background is totally in pitch darkness and there's a dark shadow right in the center frame, caused by the second slanted shelves which I find it unpleasant. Well we're not going to eliminate all the dark shadows which would make the whole image look very flat. Shadows are our best friends too. With good light and shadows, the subject would look more three-dimensional.
Next I thought of adding more yellow color on those Domino-shelves on the right and in the same exposure I lit up to eliminate the center dark shadow to bring out more form and shape for the third slanted shelves. Here's how it looks after I've combined the two exposures.
Last but not least, I lighted up the background with a very powerful halogen searchlight in two separate exposures; left and right respectively, to get more background details. Here are the two exposures.
After combining all images together and some fine tunings, here's the final result side by side with the original daylight image.
From the final image, it's more interesting to see the colored lit details that formed up shapes and lines, compared to the original snap shot which basically is the exact same thing. Virtually the only difference is the lighting. I just love the surreal aspect. This technique can be done with anybody with digital camera, a couple of good LED and/or halogen flashlights with some color gels, and a tremendous amount of energy and patience.
Before I end this presentation, here's an animated image on the making of Stack of Zeros for your viewing pleasure. Hope you enjoy reading this blog and have learnt something or being inspired. If you have applied this technique on your night photography, do share with me the links to your work on the comment box below. Would love to see your beautiful pictures.
And finally, I want to emphasize strongly that with this type of night photography and post-processing, it's necessary to bring out the best results. Unless otherwise stated, all other and most of my nocturnes work are made in the camera using light-painting techniques with little or no further Photoshop manipulations.


